Specifications for the order view page for 1.7.7 - 2019
As a merchant, I need to be able to manage all my orders processed on my website.
As a merchant, managing my orders is essential for my e-commerce, so I need to be able to:
- Check the order’s products to prepare it
- Manage the order’s progress,
- Edit the customer information or send him messages,
- Print his invoice,
- Handle payment methods,
- Follow my shipping through activities,
- Manage returns and refunds
WHY
The order view page (Orders > Orders > View button) is expected to be migrated to Symfony for the 1.7.7 version and will be reworked for improved merchant productivity and user experience.
Some new specifications for the new design are in progress but to avoid any feature regressions in the future, we need to specify the whole behavior of this page to make it easier to compare the new scenarios and avoid any new bugs and regressions.
WHAT
Thus, this project aims at specifying the new behaviors for every scenario a merchant could be dealing with in the order management. This specification should specifically define :
I. Action panel
- Update the order status
- Print order button
- View invoice show button
- View delivery slip button
- Summary of the standard refund, partial refund and return product feature
- Partial refund button
- Standard Refund button
- Return products button
- Cancel products button
- Next/Previous button
II. Customer panel
- Deleted customer
- Guest customer
- Shipping and Invoice address
- Private customer note
III. Messages panel
- Messages display
- Predefined messages
- Sending messages
IV. Products panel
- Product list
- Add new products
- Remove products from the order
- Edit products already in the order
- Cart rule list
- Add a new cart rule
- Invoice generation
- Order Summary
V. Tabs panel
- Status tab
- Documents tab
- Shipping tab
- Merchandising returns tab
SPECIFICATIONS
Orders > Orders > View order
The user gets access to the order view page by either clicking on the order’s row or the view button.
Generic page operation - Order view
On the header, we have the order’s reference, customer’s name, total price in black background, the date and the hour. All date and time formats are defined according to CLDR and the display language.
Order documents like invoices and delivery slips are, by default, in the customer language. An option allows merchants to turn it into the logistician language in the Shop Parameters > Order Settings page, cf. issue #10258.
I. Action panel
Below the panel’s header, we have all the order’s action button:
- Update the order status
- Print order button
- View invoice show button
- View delivery slip button
- Partial refund button
- Standard Refund button
- Return products button
- Cancel products button
- Next/Previous button
1. Update the order status
The current status is displayed by default on the droplist. It can be changed by selecting the new order’s status from the droplist after validating the confirmation button.
2. Print order button
Opens the Print page of the browser with the order’s content.
3. View invoice show
The Invoice can be downloaded if the current or new order status has the generation of the invoice activated or if the user has generated it manually.
4. View delivery slip
If the current or new order status has the generation of the delivery slip then the button to download the delivery slip is shown.
5. Summary of the standard refund, partial refund and return product feature
Merchandise return has to be enabled if the merchant wants to use the standard refund, partial refund and return product feature
| Button | Why | What is does | When is it displayed | When is it hidden | Option | Summarise Behaviours |
|---|---|---|---|---|---|---|
| Cancel products | To Cancel a wrong order | It deletes the products (or reduce the quantity). It also changes the order status to Canceled when all the products are canceled. | At the creation of an order and merchandise return is enabled | When the order is considered as paid | Select the products to cancel then their quantity. Press on the cancel products to confirm. | |
| Standard refund | To refund products, before it is sent to the customer (the products are still in the stock) | Refund by voucher or by credit slip of the total amount of products | When the order is considered as paid or at least one payment is linked to the order and Merchandise return is enabled | When the order is considered as shipped | - Generate a credit slip- Generate voucher- Repay shipping costs (option appears if you select to generate a voucher or a credit slip) | Select the products to refund and their quantity. Then select the refund option. Press on refund products to confirm. |
| Partial Refund | To refund any amount of products and/or the shipping cost | Refund by voucher and restock | When the order is considered as paid or at least one payment is linked to the order | Never | - Restock products- Generate a voucher | Select the quantity and amount of the refund per product, the amount of the refund for shipping cost. Select the refund options then press on Partial refund to confirm |
| Return products | To refund the returned products and restock | Refund the total price of the products, the shipping cost and restock the returned products | Order is considered as paid or at least one payment is linked to the order and shipped and merchandise return is enabled | Never | - Restock products- Generate credit slip- Generate a voucher- Repay shipping costs (option appears if you select generate a voucher or credit slip) | Select the products to refund and their quantity. Then select the refund option. Press on refund products to confirm. |
If this order has been partially paid by voucher. The merchant can refund either by selecting the total amount of the selected products or this total minus the amount of the vouchers.
Before 1.7.7, it used to have an input to select the specific amount for the voucher. The objective of the field was to customize the voucher value but it was only displayed when a voucher was applied to the order. So to customize a voucher on return product or standard refund, the order has to have a voucher applied in the order. To harmonize the behaviors, we put the specific custom edition into the partial refund button and set the return product button with straightforward options. The merchant can customize the voucher on the partial refund feature.
6. Partial refund button
If the current or new order status of the order is considered as paid then the button is shown. After clicking on the button, then the product table will take the full width of the page. The user can edit the refund amount by product and also the shipping cost. He must select the quantity of the product concerned for the refund and then enter a selected refund amount per product line. The maximum refundable amount is written below all the amount input in tax included.
By default, the entered quantity has 0 pre-filled. To release a partial refund, the user must have selected a minimum quantity of 1. The maximum refund is determined by the product totals. The limitation of the refund does not take into account the amount paid whether it is partially or paid by the customer.
Before validating a partial refund, the user can choose to re-stock or generate a voucher by checking the checkboxes.
After the validation of a partial refund, a new column is added with the quantity previously selected and the amount entered.
When the status “Refunded” is applied to the order, the refund amount is deducted from the total spent by the customer since registration and the number of valid orders placed decreases by 1.
7. Cancel products button
The cancel button is only displayed by default on the creation of an order. The button is hidden when the order is considered as paid
When pressing the button, the product list takes the full with of the page and the column cancel is added. On the column cancel, a checkbox and quantity input is displayed. Checking the checkbox will prefill the quantity input with the quantity of the product ordered. The quantity input can still be editable.
Pressing the button cancel will reduce the quantity of the products selected if there are still some left otherwise it deletes the product from the list.

To cancel products at least one of the products must be selected.
When all the products are canceled, the status automatically changes for “Canceled”.
When the status “Canceled” is applied to the order, the quantity of products in the order is returned to stock.
8. Standard products button
Standard refund is only displayed when the merchandise returns are activated and the order is considered as paid and is hidden when the order is considered as shipped.
When the user presses the button a column “Refund” is added with a checkbox and the input quantity.
A quantity of greater than 0 must be selected to refund a product.
Before refunding the products, the user can choose to generate a credit slip and/or voucher. The merchant can choose to restock the products

A product can’t be refund multiple times.
After refunding, it shows on a column “Refunded”, the quantity and the price of the refund per products.

9. Return products button
Return product is only displayed when the merchandise returns are activated and the order is considered as paid and is hidden when the order is considered as shipped.
When the user presses the button a column “Refund” is added with a checkbox and the input quantity.
A quantity must be selected to refund a product. A product can be return if it has been re-stock before by another process has a standard, cancel, or partial refund button. A product can’t be refund multiple times.
Before refunding the products, the user can choose to generate a credit slip and/or voucher or/and re-stock.

After returning the products, it shows on a column “Return” and “Refund” with the return quantity and the price of the refund per products if a generated slip was checked in the option.

10. Next/Previous button

Pressing the left arrow opens the next older order. Pressing the right arrow opens the next recent order. If the first order (the oldest one) is opened, the left arrow is disabled. If the last order (the newest one) is opened, the right arrow is disabled.
II. Customer panel
The customer panel displayed on the left of the product list has the customer’s title, name, last name, and customer reference. To see the full customer description, you can click on View full details that redirect to his customer page on another page.
The customer panel is divided into 3 parts:
- Customer card regrouping the customer’s information
- Shipping and Invoice address
- Private customer note
Customer card displays :
- the email on a “mailto” link
- date of the account registered
- valid orders placed on a black background
- total spend since registration on a black background.
1. Deleted customer
When a customer is deleted:
The customer information such as the email, the date of the account registered, the valid orders placed, the total spend since registration, shipping and invoice address drop-down button, and the private note block are not displayed.
The customer name is changed to “Deteled customer”. It removes the icon account box and the link to redirect to the full details customer page.
2. Guest customer
If the customer is a guest: The fields “account registered” and “total spent” are hidden. Below the customer name, “Guest” in grey (Open sans semibold 14px #6C868E) is displayed.
The button to transform a guest into a customer is removed. The feature is still available on the customer page. The order is not the place to handle customer management. It was removed to not encourage the merchant to transform Guest to a Customer account by letting a button on the order page.
3. Shipping and Invoice address
Each address has a button to update or change it. The button opens a list to select to edit or update it. Editing an address creates a new address and soft-deletes the old one. So, if the edited address is used by an old order, it will not be updated with the new address.
Edit/Change Addresse behaviors
The edit address redirects to the edit address page of the selected address. After saving any edit of the fields of the address form, the user is redirected to the order that he was editing in the first place.
And change address opens the pop in that allows the user to choose the new address form a droplist.
When all the products in the order are virtual products, only the invoice address is displayed.
4. Private customer note
Private customer note saves or displays a note for the corresponding customer. The same note will be share for all the orders from the same customer. It is closed by default when it is empty and open by default when filled. To add a note when it is empty, the user has to click on the + button and has to press the save button to save it.
III. Messages panel
Bellow the customer panel, you have the messages panel. The total of the exchanged messages is displayed next to the panel’s title.
1. Messages display
Only the 4 last messages private or public are displayed showing the sender’s name, delivery’s date, and the content’s message. The private message is displayed with a dark background and a specific icon for the sender pic.
If the merchant has added a message to the order during the creation, the message is displayed here as a private message
To see all the past messages, the merchant can click on View full conversation to open on a popup.
2. Predefined messages
Bellow the messages displayed, the user can choose an order message to send into the droplist containing the predefined messages of the order messages page. Selecting the message prefills the message input text. By default, there is no prefilled message so the droplist shows “-”. below the droplist, the link named “configure predefined messages” is available. It redirects tothe order messages page to access the predefined messages.
After selecting the droplist selection, the prefilled text is still editable.
3. Sending messages
A checkbox is available to choose to write a private message hidden from the customer.
Using the prefilled message or writing the message from scratch, the user sends it by clicking on Send message . It sends the message by email and adds the message on the front-office on the message section of the order historic page and an email as presented on the screenshots below.
The maximum of character in the text input is 1200 char. If the merchant manages to send a message of more than 1200 characters, the message is not sent and the warning message “This field cannot be longer than 1200 characters” is displayed below the text input.
IV. Products panel
1. The Product list
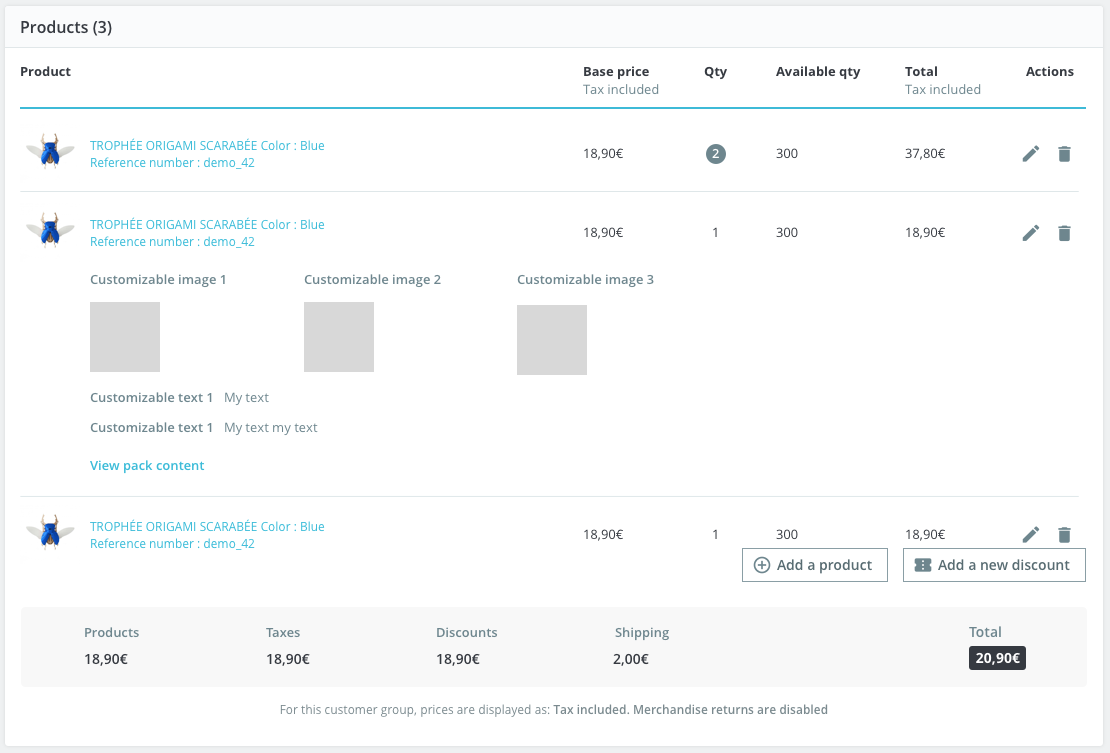
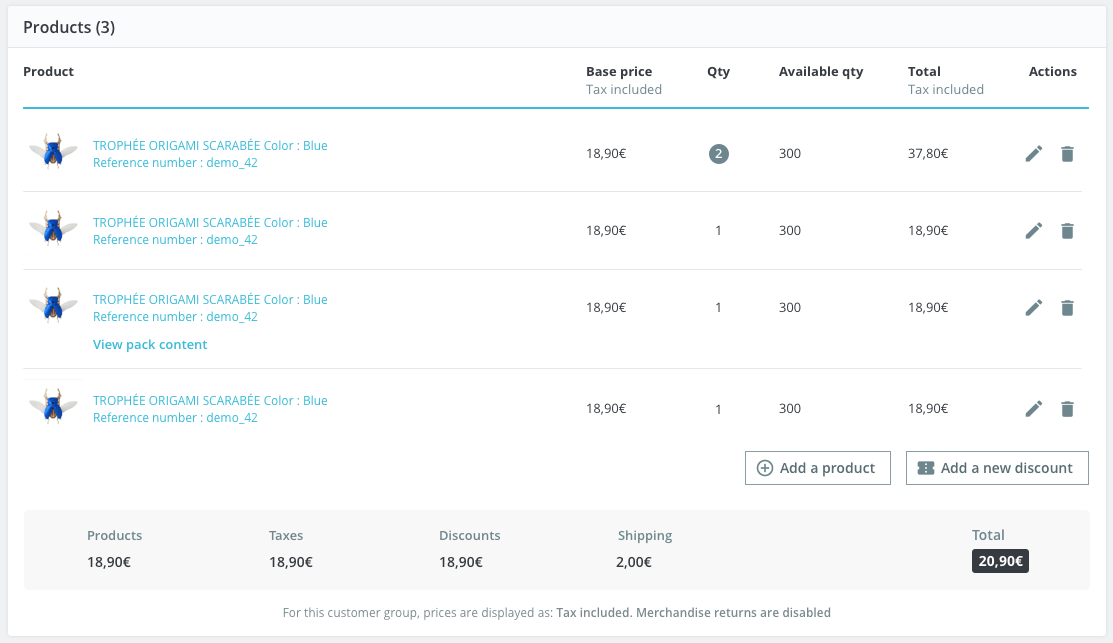
Below the actions button and on the right of the customer panel, the product panel displays the order’s products into the table list showing:
- the product’s image,
- product name (with its name, combination name, and reference),
- stock location, if one of the products has one
- base price with tax included,
- quantity,
- available quantity,
- total with tax included,
- and 2 action buttons : edit and delete.
The list of products is displayed in reverse chronological order of the date of addition (the last added products are displayed first).
When the product has customization, a row is added below the product with the labels of the customization and the content from the customer (image or text). When the number of images exceeds the size of the toe, they go to the next line.
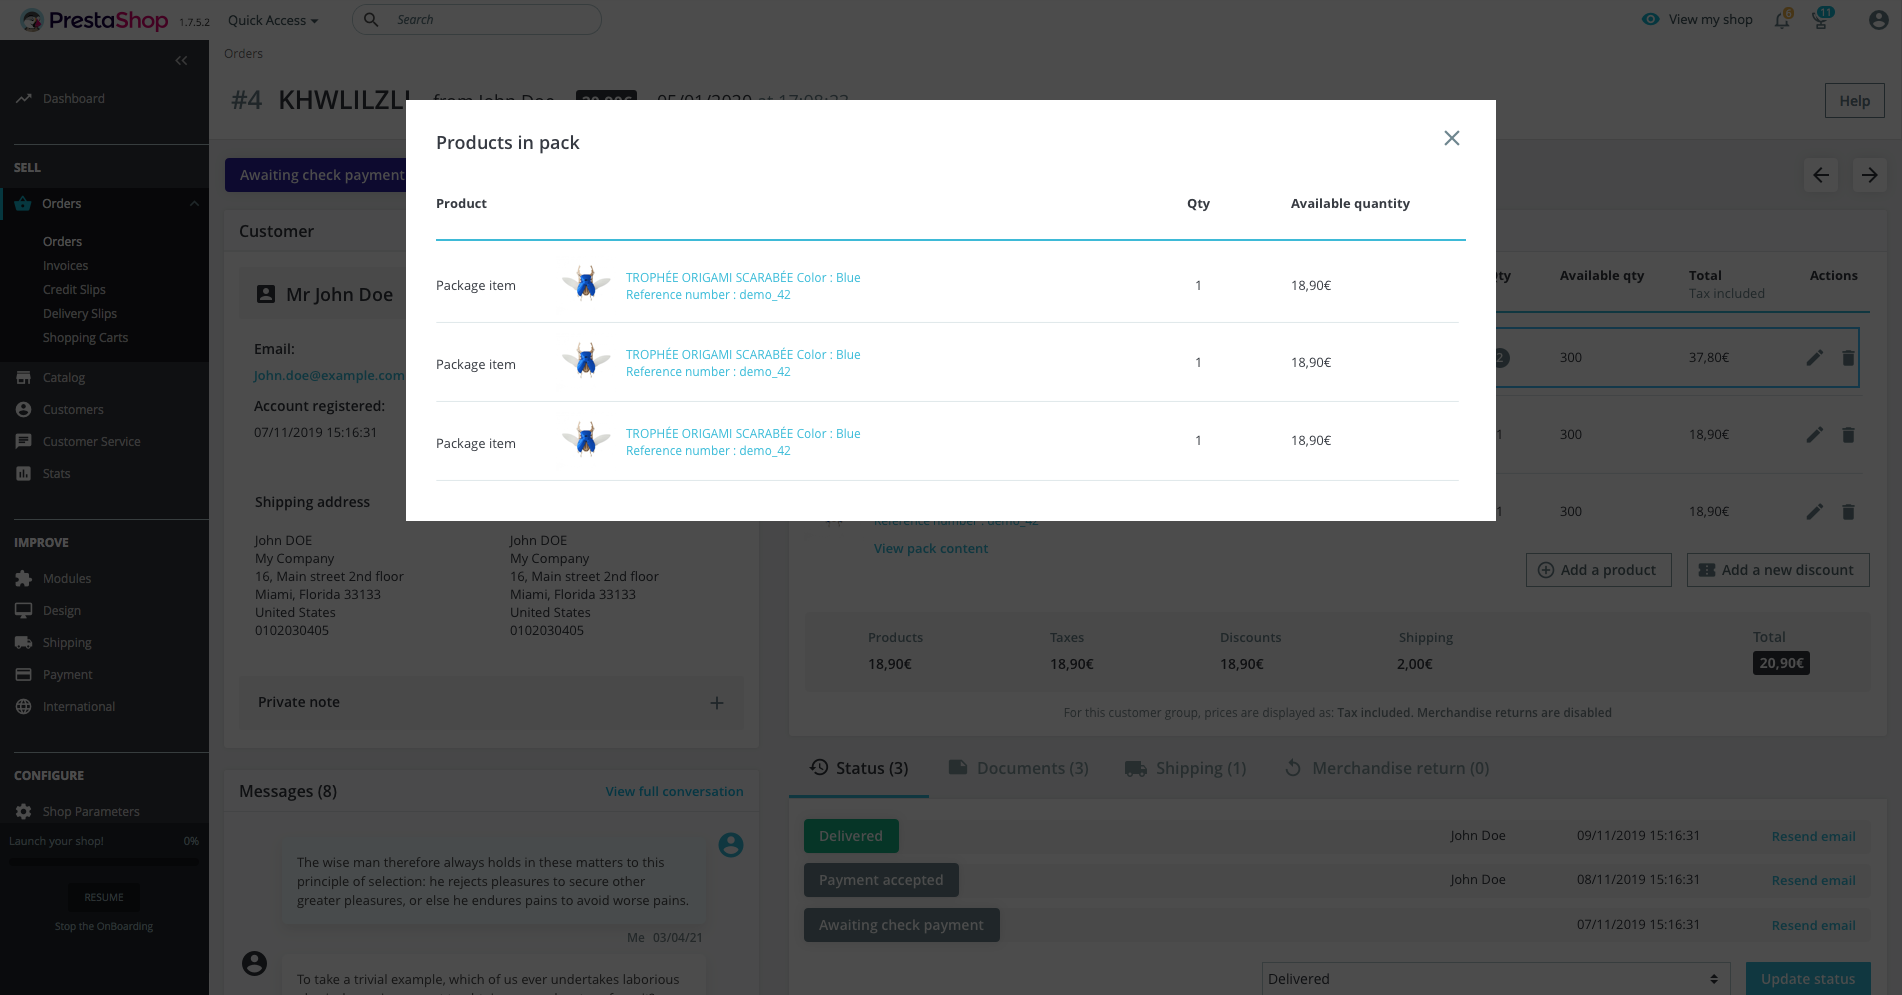
popin displaying the products from the pack
When the product is a pack of products, a link is added below the product name to show all the products in a pop in.
By pressing on the link “View pack content”, it shows all the products from the pack in a pop in:
Popin displaying the products from the pack
The pagination of the list starts when there are more than 8 products The stock location column is hidden only when none of the products has a stock location. The column is only displayed at the corresponding pagination. If only a product on page 2 of the list has a stock location then the stock location column appears on page 2 and hidden in the other pages.
The quantity is colored in a dark grey background if there are at least 2 quantities.
Possible actions:
In an existing order (until it gets the order status “Processing in progress”), it is possible to perform actions on the order’s products and discounts. Merchants can :
- add new products to the order
- remove products from the order
- modify elements of existing products
- add new cart rules to the order
Below the totals, a warning message is displayed to warn the user that for this customer group, prices are displayed as HT or for this customer group, prices are displayed as TTC depending on the customer group setting and also that returns are disabled. when the merchandise return is disabled on the merchandise returns page.
2. Add new products
When clicking on Add a product, it adds a row on the table list with a search bar on the product name column. The merchant can search for any available product. If the desired product has combinations, a drop list appears below the search bar. After selecting the product, the user can edit if needed :
- the base price tax excluded or tax included. When modifying one field, it automatically modifies the second field according to the product tax.
- the quantity: The quantity input is an input type number that decreases the stock left when the user increases the quantity. If the quantity selected is higher than the stock, the available quantity label becomes red. The product is added in the product table and to the order after pressing on the add button: if the quantity is greater than 0; if the quantity is less than or equal to the quantity available. Otherwise, a warning error is shown (except if the stock parameter allows selling without stocks (in Product quantities tab). In this situation, the merchant can add as many product items as he wants).
When a product is successfully added to the order, a notification of success is displayed: “The item was successfully added.” in Admin.Notifications.Success. Then the product list is reloaded behind the loading spinner to check if any new products could be added through automatics carts rules. The user is redirected to the first page of the product list.
When I add a product already present in the order from the back office, the addition is blocked by displaying the following error message (EM): “This product is already in your order, please edit the quantity instead.”
When I have a multi invoice and I add the product to an invoice that already contains the product, the addition is blocked by displaying the following error message “This product is already in invoice #number, please edit the quantity instead.” localized in Admin.Notifications.Error
- Add a product with a specific price based on the quantity
ORSP1: When a user adds a product with a specific price based on the quantity on the order page of BO, the specific price is applied only if the base price is not edited on the form and the product’s quantity is superior or equal to the specific price’s quantity.
When a user edits a product with a specific price based on the quantity on the order page of BO, the product price is not updated even if the specific price rule matches the product quantity.
_Adding a product’s combination
If the “Quantity discounts based on” option is set to “Products”, the specific price rule is only applied if there are no other combinations from the same product in the order and the product’s quantity and ORSP1.
Adding a product already present in the order to a new invoice
If a product already exists in the order is added into a new invoice, the specific price on the quantity is not applied.
A gifted product is not included in the quantity rules of a specific price.
- **Add a product already present in the order
When the merchant wants to add more quantities of the same product, he has to edit the product quantity to add some items.
- Product minimum quantity
The minimum quantity of a product is determined by all the products of the order regardless of whether the products are separated between invoices. It allows a merchant to add a product on another invoice because the minimum quantity is respected in the order. Editing the quantity of the product to a quantity less than the minimum quantity required is authorized, the responsibility belongs to the merchant.
For example, when I add a product A with a minimum quantity, if the quantity of the new product A and the current quantity is equal to or greater than the product is added. Otherwise, an error is launched: “Error! Minimum quantity of X must be added”, X quantity missing to be equal to the required minimum quantity.
A product allowed to be ordered out of stock can be added to an order without complying with the minimum quantity rule.
- Product associated to cart rule
When I add a product associated with a discount to an order, the discount is also added.
-
In the case of a discount on the total of the order, if I add a second time this product, the discount should not be added and avoid the accumulation of discount.
-
In the case of reduction to a specific product of a fixed amount, the discount is applied only once despite the number of quantities of the same product in the cart and the total per user strictly greater than 1.
If the discount is updated the order remains the same.
- Cart rule behaviors
Specific scenario: Adding a product recalculates all discounts and the total price. So if the merchant has a discount linked to a specific product for example at 40%. Then he changes the discount to 50% discount. Finally, he adds a new product, the discount will update and a 50% discount will be applied to the order.
Specific scenarios: A product added in an order with a discount attached to it is added in the order as well.
In the case of a discount to a specific product by percentage, the discount applies to the total amount of the product taking into account the quantity, i.e. the discount = quantity of the product * %. But only applies once in the basket even if the merchant can still use the discount on other carts (total user for each user > 0).
- Multi invoices behaviors
When I add a product when an invoice is already generated, the merchant can choose to:
- Offer free shipping for this product or apply the shipping cost
- Associate the product to an existing or new invoice
When the order has several invoices, it is possible to add an already existing product to the order if they are related to a different invoice. There is only one possible price per product even if they are from different invoices. Therefore, if a product is added with a different price in another invoice, the price will be updated on the first invoice. To avoid confusion, a pop-up window will be displayed before the addition to confirm that the action may have an impact on the other order.
3. Remove products from the order
Deleting one or several products is very easy: a remove icon is available to remove one or several quantities of a paid product.
When a product is removed from the order, a notification is displayed: “The item was successfully removed.” in Admin.Notifications.Error. Then the product list is refreshed behind the loading spinner to check if any gift product has to be removed as well. The user is redirected to the page where the user was when the product has been removed. If the removed product was on the last page, the user is redirected to the second-last page.
Current bug: if I delete the paid product, it will also delete the gifted product (the voucher is still displayed). The deletion should only delete the paid product.
Specific scenarios : when a product in the cart is a gift product (from a cart rule) Note that it is not possible to delete a gift product from the cart, it’s only possible by removing the associated cart rule.
Furthermore, If the merchant has a paid product, and the same product, but gifted, in the cart, he should not have a Remove button available on the product line. The remove button only appears when there are no longer gift products on the same product line.
A confirmation pop-up appears after clicking on the Delete button.
If the user deletes all the products, the order status remains the same.
- Edit products already in the order
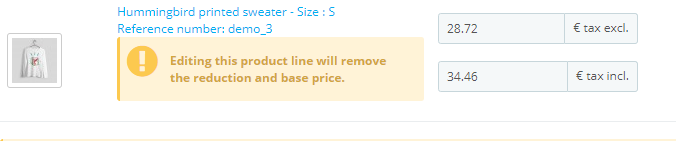
When clicking on the edit button of a product line, the user is allowed to edit :
- The product base price tax excluded or tax included. When modifying one field, it automatically modifies the second field according to the product tax. ex: If the user edits an amount in the input without tax it will insert the amount plus the product taxes in the input with tax automatically. And vice versa, if the user edits an amount in the input with tax it will insert the amount less the product taxes in the input without tax.
- The quantity of the product. Behaviors are the same as when merchants add new products. Increasing or decreasing will update the stock available quantity.
The merchant is warned if he edits the price of the product with a specific price or a catalog price rule.
While editing the quantity, the total price will be updated multiplying quantity with the base price. The Update button saves the modification and Cancel button drops them.
These rules apply for all types of products, with or without combinations. Nevertheless, there are some specific cases, detailed below :
-
If the product had associated cart rule. In this situation, if applicable, then when adding this product to the order (or adding the quantity of the same product), the base price will be automatically recalculated to include the discount. If the conditions are not met (ex: expired date, only for a specific customer, etc.), then the normal price is applied.
-
If the product has a Minimum quantity for sale higher than 1, defined in the Product quantity tab. In this situation, when trying to add a product with less than the minimum quantity, an error will be displayed with the required minimum quantity. Then, by editing this quantity, the merchant can enter any quantity, the verification is done only when adding.
-
If the product has additional shipping fees associated with it, then the fees are added to the final shipping fees of the order.
5. Cart rule list
The below the product panel, there is the order’s summary:
- Products total with taxes excluded
- Total shipping
- Discount if there is any cart rule applied
- Wrapping if there is a wrapping option in the order
- Taxes
- Total in black background
Condition of cart rule:
- temporal discount does not affect
6. Add a new cart rule
- Add a new discount: opens a pop in to create your new cart rule between the percentage, the amount (taxes included), and Free shipping type. The value must be a percent or amount value greater than 0. The percent value cannot exceed 100 and the discount value cannot exceed the total price of the products (the shipping cost is not included).
The vouchers will be added to the table list displaying the discount name, value, and the delete button on the top of the summary order. The new discount created is added with the status deactivated on the cart rule page with zero quantity.
If the order status is considered as paid, either on adding a product or adding a discount adding, the user has to specify on which generated invoices will be applied.
7. Invoice generation
Specific scenarios: When a new invoice is created with free shipping, a discount is generated at the value of the shipping cost with the name:"[gGenerated] CartRule for Free Shipping". On the invoice, the discount is not displayed. It only displays the free shipping in Shipping Costs.
8. Order Summary
The below the product panel, there is the order’s summary:
- Products total with taxes excluded
- Total shipping
- Discount if there is any cart rule applied
- Wrapping if there is a wrapping option in the order
- Taxes
- Total in black background
Below the totals, a warning message is displayed to warn the user that for this customer group, prices are displayed as HT or for this customer group, prices are displayed as TTC depending on the customer group setting and also that returns are disabled. when the merchandise return is disabled on the merchandise returns page.
V. Tabs panel
All the tabs are located in the same panel below the products list.
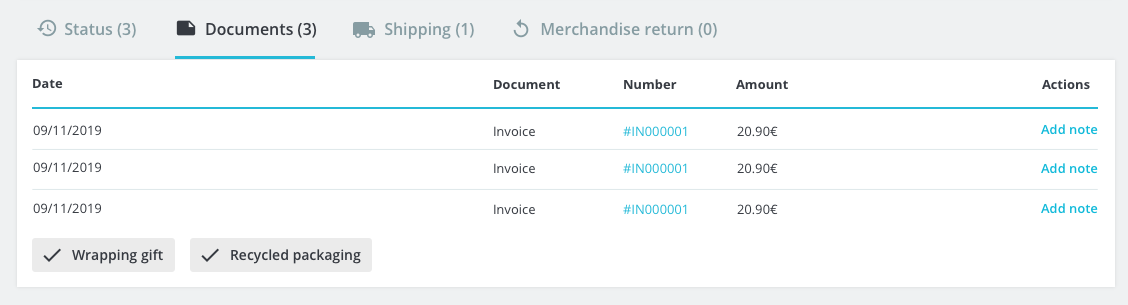
The label “Wrapping gift” and “Recycled packaging” are only shown when the feature is present in the order. It must be shown on all the tabs.
1. Status tab
The table list of the latest order status is displayed composed:
- The status with associated colored
- date and hour
- The editor
- Button to resend the email to the customer
Below the list, a drop list of all the status available is displayed to update the current status through the button Update Status next to it. Updating the order status will trigger all the actions set by the order status.
On the bottom of the block, there is the Order comment. The order comment saves a comment for the corresponding order. It is closed by default when it is empty and open when filled. To add a comment when it is empty, the user has to click on the + button and has to press the save button to save it.
2. Documents tab
The document tab regrouped all the document as invoices and delivery slips in a table. The table displays the date, document type, reference, and the amount. The reference is a clickable link to download the document.
Each table’s rows as 2 possible button actions:
- Enter payment: it redirects to the payment panel to fill the transaction with the invoice preselected.
- Add note/Edit note: it displays a text input that can be saved or cancel. The saved note will be integrated into the related document.
If there is no document, a button is available to generate an invoice with all the information saved so far in the order.
3. Shipping tab
If there is a gift wrapping message for the order, it’s displayed in the Shipping tab, before the table.
The carrier table shows the date, the carrier, the weight, the shipping cost, the tracking number, and the edit button.
The edit shipping button on each row can edit the information in a pop in. You can edit the text input the tracking number and in the drop list the carrier method.
4. Merchandising returns tab
The merchandise return tab lists the date, the type, the carrier (= return status), and the number (= return reference number). When the merchandise return is disabled the tab displayed: “no merchandise returned yet”.
5. Payment panel
The payment section displays all the transactions made in the order from the payment module or the manual inputs.
The table shows the date and hours, the payment method, the transaction ID, the amount with the currency, and the button detail.
To fill a payment transaction, the user has to select the date, one payment method from a droplist, the amount, and currency then press the add button. The amount can be a positive or negative value.
A red warning is shown if the filled amount is inferior or superior to the order’s total comparing the total of the transactions and order’s total.
After adding, the user can display all the details of the transaction by pressing the Detail button. It will show below the arrow the number, brand, expiration date, and owner of the credit card for any payment module.
If the order’s status is considered as paid then before adding a transaction the user has to specify in which generated invoices from a droplist it will be added.
When the status accepted (waiting for payment) you can change the currency of the order with a drop list.
If the shop has different currencies, a droplist of the shop’s currencies is displayed to change the order currency. The change rate is based on the latest conversion rate saved in the shop.
VI. Sources
Steps to display:
- Activate multistore
- Create a new shop group, which does not share nor customers, nor available quantities to sell
- Create a new shop in this group (importing data from the main shop)
- Go to FO, make an order (without registering), there should be the “Sources” block on this order on BO now
It displays the date and from where the user came from.
VII. Links
VIII. Multistore
An order made from a specific shop can be edited from any shops. Even if the shop where the order is edited isn’t in the same group as the shop where the order was made.
In a multistore context, the next and previous buttons for navigating between orders work according to the selected context in the back-office (specific shop, group of shops or all shops) If a specific shop group is selected as context in the order list, then the user can navigate between orders belonging only to this shop group in the order view page. If a specific shop is selected as context in the order list, then the user can navigate between orders belonging only to this shop in the order view page. If “All shops” is selected as context in the order list, then the user can navigate between orders from all the shops in the order view page.