The following call to action, the logo, and steps are displayed at each step while adding or editing a carrier
Call to action
A call to action button at the top right is displayed:
- Cancel : Pressing the button redirects to the carriers listing page.
A call to action button at the bottom right is displayed:
- Previous: In the first step, this button is disabled.
- Next: If there is an error, this button is disabled. After clicking on it, the next step is displayed.
- Finish: This button is enabled only at the last “Summary” step and if there are no errors. After clicking on it, the carrier is saved and the carriers listing page is displayed with the following success message: “Successful creation” if a carrier was added or “Successful update” if a carrier was edited.
Logo
Firstly on the left, the logo is displayed as soon as it’s uploaded. Once the logo has been uploaded, a trash icon appears on the right of the logo. When trying to delete the logo, a message is displayed: “Are you sure you want to delete the logo?”. Pressing “Ok” will remove the uploaded logo, and the default logo will re-appear in the same place.
Steps
- 1 General settings
- 2 Multistore (If multistore is enabled)
- 3 Shipping locations and costs
- 4 Size, weight, and group access
- 5 Summary
General settings (1st step)
Fields
-
Carrier name. This is a mandatory field, when trying to proceed to the next step without inputting this field, the following error message is displayed: “The name field is required.” When trying to enter invalid characters to this field, and trying to proceed to the next step, the following error message is displayed: “The name field is invalid”. The following tooltip is displayed: “Allowed characters: letters, spaces and “().-”. The carrier’s name will be displayed during checkout. For in-store pickup, enter 0 to replace the carrier name with your shop name.”.
-
Transit time. This field is mandatory, when trying to proceed to the next step without inputting this field, the following error message is displayed: “The field delay is required at least in default language”. When trying to enter invalid characters to this field, and trying to proceed to the next step, the following error message is displayed: “The delay field is invalid.”. This field can be translated: When several languages are installed, a drop-down next to the field is displayed with default language selected. It allows choosing in which language the field is displayed and customizing it according to the language. Disabled languages are displayed in the drop-down. The following tooltip is displayed: “The delivery time will be displayed during checkout.”.
-
Speed grade. Only one number from 0 to 9 is allowed in this field. If an incorrect character is filled, the following error message is displayed: “The grade field is invalid.”. If more than 1 number is filled, the following error message is displayed: “The grade field is too long (1 chars max).”. The following tooltip is displayed: “Ented a “0” for a longest shipping delay, or “9” for the shortest shipping delay.”.
-
Logo. This field allows uploading a logo. To upload a logo, there is a button on the right of the field named “Choose a file”. A help text is displayed under the field: “Format: JPG, GIF, PNG. Filesize: 8.00 MB max. Current size: undefined.”. When trying to upload an image with a wrong format or > 8MB, the following error message is displayed: “Cannot upload file”.
-
Tracking URL. A help text is displayed under the field: “For example: ‘http://example.com/track.php?num=@' with ‘@’ where the tracking number should appear.”. A tooltip is displayed: “Delivery tracking URL: Type ‘@’ where the tracking number should appear. It will be automatically replaced by the tracking number.” The URL should be written as displayed in the tooltip, otherwise, the following error message is displayed: “The url field is invalid.”.
Multistore (2nd step)
This step is displayed only when the multistore is enabled and if there are several shops.
The shop association block is displayed when the multistore is enabled and if several shops are configured.
👉 See the specs of the shop association block
Shipping locations and costs (3rd step)
Fields
- Add handling costs. This toggle allows choosing if the handling costs are added to the final price or not. By default, this toggle is disabled. A tooltip is displayed: “Include the handling costs (as set in Shipping > Preferences) in the final carrier price.”
- Free shipping. This toggle allows choosing if the carrier is free or not. By default, this toggle is disabled. When this toggle is enabled, the toggle “Add handling costs” automatically switched to “no” and becomes disabled as all the input fields for “ranges”.
- Billing. 2 radio buttons are displayed: “According to total price.” and “According to total weight.”. By default, according to total weight is selected. When “According to total price” is selected, the ranges are defined by currency. The currency displayed is the default one configured in International > Localization. When “According to total weight” is selected, the ranges are defined by weight. The weight displayed is the one defined in International > Localization.
- Tax. The drop-down menu displays all the enabled tax rules existing in International > Taxes > Taxes rules. By default the value “No tax " is selected.
- Out-of-range behavior this drop-down menu allows to select one of the 2 options: “Apply the cost of the highest defined range” or “Disable carrier”. By default the option “Apply the cost of the highest defined range” is selected. A tooltip is displayed: “Out-of-range behavior occurs when no defined range matches the customer’s cart (e.g. when the weight of the cart is greater than the highest weight limit is defined by the weight ranges).”
If the total weight or total price of the cart is not in one of the defined ranges and if the chosen option is “Disable carrier”, then the carrier will be disabled. If the total weight or total price of the cart is not in one of the defined ranges and if the chosen option is “Apply the cost of the highest defined range”, then the carrier price will be the one corresponding to the highest range.
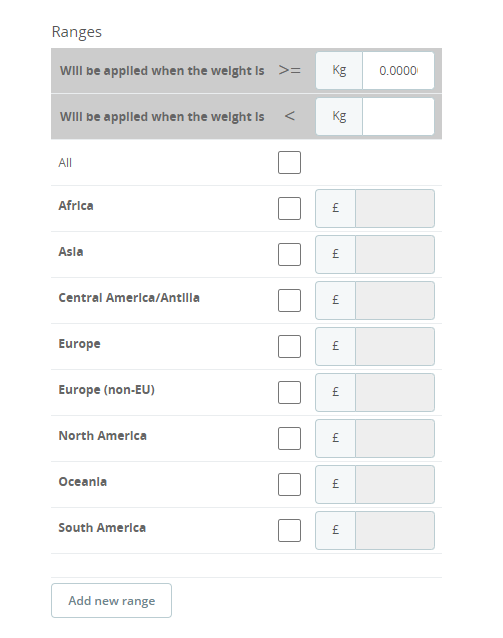
- Ranges
2 fields are displayed:
- Will be applied when the weight or price is >= weight or currency
- Will be applied when the weight or price is < weight or currency The weight or the currency is displayed depending on the option chosen above for the billing. By default, this field is empty Only numbers can be entered in the 2 ranges fields above. If one of the fields contains something other than a number the following error message is displayed: “This range is not valid” and the fields for all zones are disabled. If one of the ranges overlaps another, the following error message is displayed: “Ranges are overlapping” and the fields for all zones are disabled.
- All This field is disabled if the checkbox isn’t checked. When the checkbox is checked, the field is enabled and all the zones below become checked
All the zones existing in International > Locations > Zones are displayed below. The disabled zones are marked as inactive. When trying to go to the next step without selecting any zone the following error message is displayed: “Please select at least one zone”. Each zone has a checkbox allowing to enable its field. Only numbers are allowed in zones fields, inputting any other symbol will result in the field being marked in red.
Call to action
There is a button “Add new range” below the table. When this button is pressed, a new column is displayed. When clicking on it and if one of the existing ranges isn’t completed, the following message is displayed “Please validate the last range before creating a new one.” Under each range added, a “Delete” button is displayed. When clicking on it, a modal is displayed: “Are you sure to delete this range?”. The range is deleted after clicking on “ok”.
Size, weight, and group access (4th step)
Fields
- Maximum package width (Dimension unit) This is a field. The following tooltip is displayed: “Maximum width managed by this carrier. Set the value to “0”, or leave this field blank to ignore. The value must be an integer.” The dimension unit mentioned in parenthesis is the one defined in International > Localization > Localization If what is filled is not an integer, the following error message is displayed: “The max_width field is invalid.”
- Maximum package height (dimension unit) This is a field. The following tooltip is displayed: “Maximum height managed by this carrier. Set the value to “0”, or leave this field blank to ignore. The value must be an integer.” The dimension unit mentioned in parenthesis is the one defined in International > Localization > Localization If what is filled is not an integer, the following error message is displayed: “The max_height field is invalid.”
- Maximum package depth (dimension unit) This is a field. The following tooltip is displayed: “Maximum height managed by this carrier. Set the value to “0”, or leave this field blank to ignore. The value must be an integer.”. The dimension unit mentioned in parenthesis is the one defined in International > Localization > Localization. If what is filled is not an integer, the following error message is displayed: “The max_depth field is invalid.”
- Maximum package weight (Weight unit) This is a field. The following tooltip is displayed: “Maximum height managed by this carrier. Set the value to “0”, or leave this field blank to ignore.”. The weight unit mentioned in parenthesis is the one defined in International > Localization > Localization.
- Group access The ID and the name of all existing customers’ groups are displayed. A checkbox is displayed before each group to select or unselect them. A global checkbox allows selecting/unselecting all customers' groups in one click. By default, all the customers' groups are checked. The following tooltip is displayed: “Mark the groups that are allowed access to this carrier.”
Summary (5th step)
Carrier summary
The informations about the carrier being created are displayed:
The carrier’s price, the transit time, if the shipping costs are calculated according to the price or to the weight, the tax rule, the different ranges, the behavior if the weight or the price is higher than the defined ranges, the delivery zones, the customers' groups, and the shops are displayed.
Below, a toggle “Enabled” is displayed. It can be enabled or disabled. By default, it’s enabled. The following tooltip is displayed: “Enable the carrier in the front office.”