How to rebase your Git branch
git rebase can be tricky, but remains your friend!
Contributing code to PrestaShop can be scary for first-timers, because not everyone knows how Git works. By the time you have figured how to properly push your changes to GitHub, the codebase has changed, rendering your suggestions impossible to merge – leading to frustration on both sides. It’s high time you learn about git rebase.
Files often change an Open Source project. Between the time you fix an issue and create a pull request, and the time a Core developer takes a look at your PR, the target files can have changed a couple times (or more). “Could you rebase?”, asks the Core developer. Easier said than done, but we’ll give you a step-by-step guide on how to do it.
This article was initially a comment by @shudrum on a PR by @kpodemski. Thanks for the inspiration, people!
You can only rebase a pull request when its commits were pushed to GitHub using Git’s command-line tool. It is NOT possible to rebase code that has been submitted through GitHub’s online edition form.
We therefore advise you to learn the basics of Git before contributing code. It will be a very valuable addition to your development toolbox. It will also let Core developers know that
- you know what you are doing,
- you can work with them in improving your code in the PR,
- your changes have been tested on your local install (= less likely to contain a typo).
Go Git!
What is rebasing?
Rebasing updates the history of your local Git repository so that it is synchronized with the history of the official Git repository. Once you have rebased your repo, it contains all the changes that have been merged to Core since you created your code changes. This way, your pull request can be merged safely: it won’t break the destination codebase.
In short, rebasing makes for a cleaner history :)
The reason why Core devs ask you to rebase
Either you rebase your code, or it takes a lot more time to test your changes and merge them. Therefore, there’s a good chance that your suggestion will be either discarded or forgotten if you don’t update it. Better rebase it yourself!
Also, rebasing is the right way to squash several commits into one. This is often an issue, particularly when you find yourself with a “Merge: XXX” commit out of nowhere. Rebasing avoids merge commits.
Finally, automated tests sometimes fail for no good reason, so rebasing is one way to trigger them again, until they go green. You don’t have to wait for the Core to restart the tests anymore!
Let’s rebase!
The firsts times using git rebase are not so easy! You have to understand the links between your local repository and PrestaShop’s repository, and how Git works with the history of each – which are essentially two separate branches of the same project.
If you look at your local history, you should see something like this:

As you can see, the branch has 3 commits from the contributor, with various levels of respect for the naming convention. The oldest one respects the convention; the second one certainly does not; the most recent one is better but still superfluous.
git lg is a shortcode to an improvement over the standard git log. See how you can enjoy the same improvement!
You can see that the latest commit has the 9a7b798 identifier (short for the 9b9b47e9fe591e2f4b1f9bb2dd18c4fa5e715b55 sha1 hash, but the seven first characters are unique enough for identification in this context).
If you have not updated your local repository, the develop branch should be at the same location. To correctly rebase the branch, you can use git rebase -i 9a7b798.
Let’s break this down:
git rebaseis the command to use when rebasing. It reapplies commits on top of another base tip.-iis short for--interactive. This option ofgit rebasemakes a list of the commits which are about to be rebased, then lets the user edit that list in the default editor in order to squash several commits into one.9a7b798is the identifier of the commit that you want to work from. Since
After typing this, your editor starts and you can see a file like this:
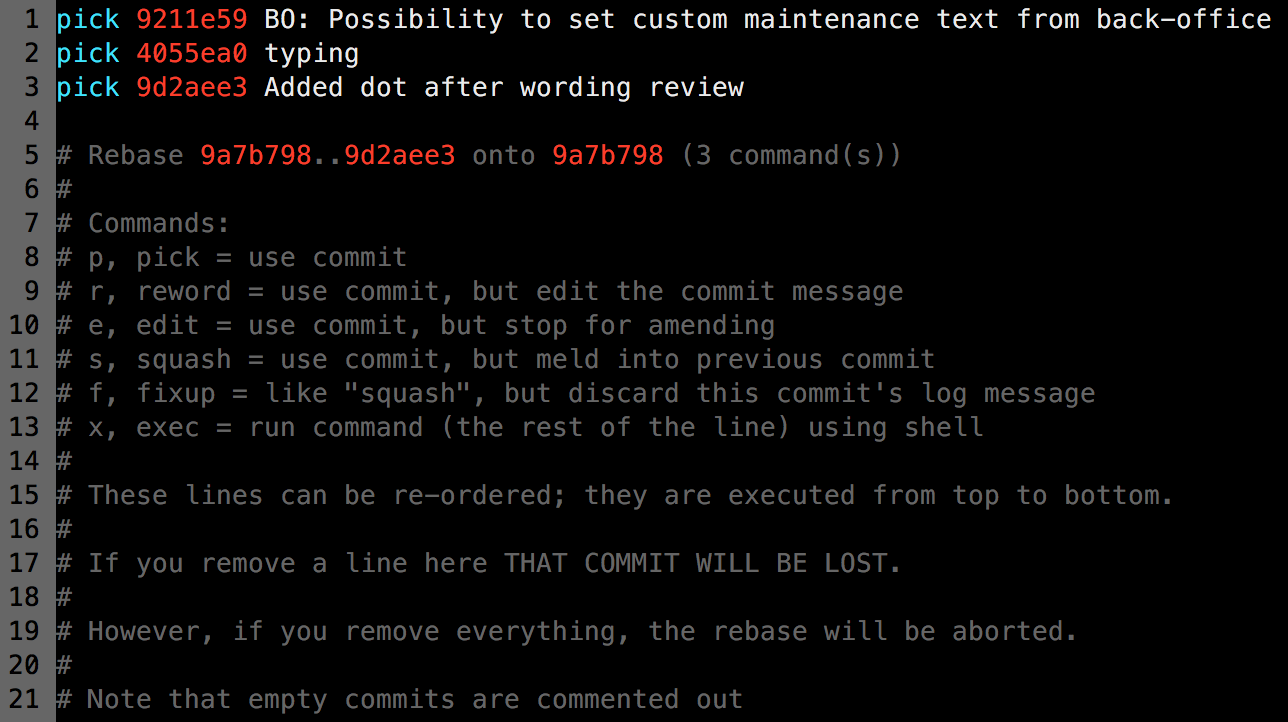
Your recent commits are listed at the top of the file, with a verb, the hash, and the commit name. By default, all three commits are picked as-is – meaning that the commits are kept unchanged.
If you read the comments, you can see the different options you have instead of just picking the commits. In our case, you need to squash the commits into the first one, so just edit this file like this:

With this, the second commit will fuse with the first one, and then the third one will do the same.
Save and close the file. If your system has you use Vim (command line editor), you can save and quit by hitting the Esckey (Vim goes into command mode) and typing :wq (for “write and quit”).
Another file will automatically open:
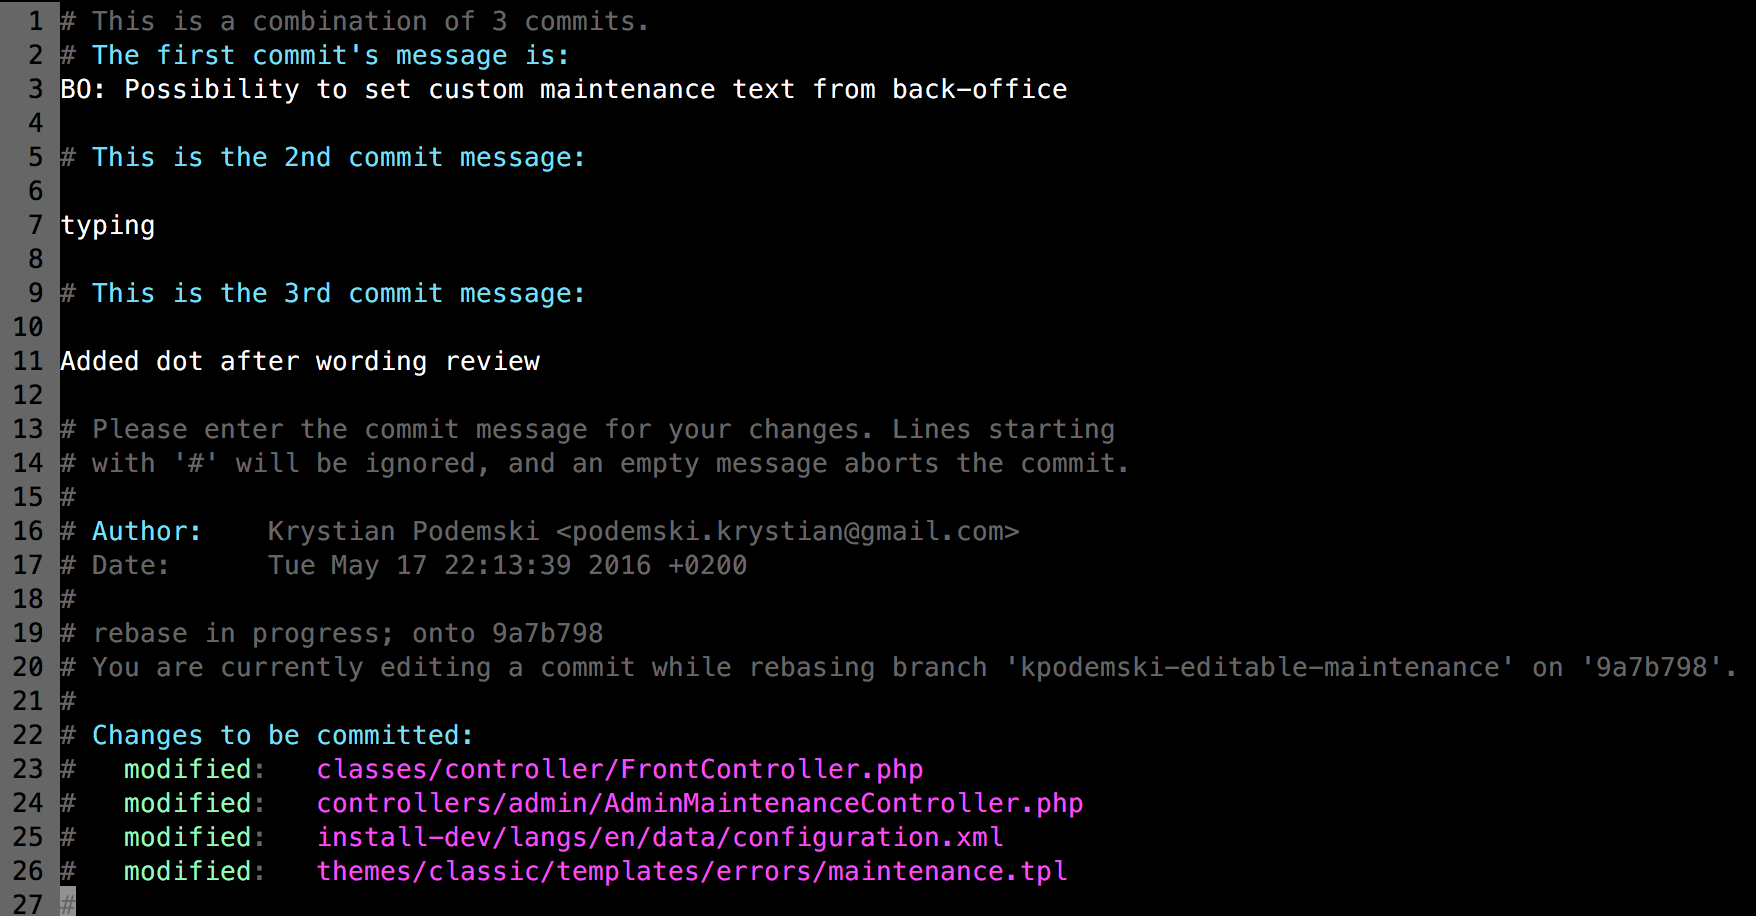
On the third line, you can edit the commit names. If it’s fine as it is, keep it that way. It might be a good time to ensure that your commit follow PrestaShop’s commit naming convention.
The other lines describe the two others commit names, set as comments. You can safely remove these and the followin comment lines if you wish.
Edit the main commit name as you like, then save and close (Esc+:wq).
If you look again at your history, you should now see:

TADA! Just one clean commit! Now comes the last step: type git push -f. This will force Git to update your remote reference even if it isn’t an ancestor of the local reference used to overwrite it. Once pushed, your branch is rebased – and your PR is updated accordingly.
Yay!
Learn more Git
First timer
- GitHub’s Try Git: https://try.github.io
- The official Getting Started: https://git-scm.com/book/en/v2/Getting-Started-About-Version-Control
- Git - The simple guide: http://rogerdudler.github.io/git-guide
“I know how to push, what’s next?”
- Codeschool: https://www.codeschool.com/courses/git-real
- Udacity: https://www.udacity.com/course/how-to-use-git-and-github–ud775
- Git Tower Learn: https://www.git-tower.com/learn
Advanced
- Learn Git branching: http://learngitbranching.js.org
- Atlassian’s tutorials: https://www.atlassian.com/git/tutorials/advanced-overview